Let's Draw!
Copyright © 2024 Crafty Corner Shop. All rights reserved.

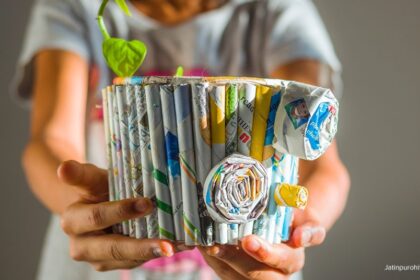
Have you ever looked at an old jar, a piece of scrap wood, or a worn-out sweater and thought to yourself, “I could turn that into something beautiful”? If so, you’re not alone! Upcycling is the art of taking everyday objects and turning them into something new and unique. It’s a great way to reduce waste, save money, and unleash your creativity. In this blog post, we’ll explore the world of creative upcycling and share some tips and ideas for transforming ordinary items into beautiful crafts.
The first step in creative upcycling is to look at the items you already have in a new light. Instead of throwing things away when they no longer serve their original purpose, consider how you might repurpose them into something else. For example, an old mason jar can be transformed into a stylish candle holder by simply adding some paint and decorative accents. A piece of scrap wood can become a rustic picture frame with a little sanding and staining. The possibilities are endless!
Next, gather inspiration from the world around you. Look for ideas on Pinterest, Instagram, or craft blogs for creative upcycling projects that catch your eye. You might find inspiration in nature, architecture, or even fashion trends. Keep an open mind and be willing to experiment with different materials and techniques. Remember that there are no rules when it comes to upcycling – just let your imagination run wild!
Once you have some ideas in mind, it’s time to roll up your sleeves and get crafting! Set aside some dedicated time to work on your upcycling projects without distractions. Gather the necessary supplies – whether it’s paint, glue, fabric scraps, or other materials – and set up a designated workspace where you can spread out and get creative. Don’t be afraid to make mistakes or try new things; sometimes the most unexpected combinations lead to the most beautiful results.
As you work on your upcycling projects, remember to enjoy the process as much as the finished product. Crafting is meant to be fun and relaxing, so don’t put too much pressure on yourself to create something perfect. Embrace imperfections as part of the charm of handmade items. And don’t forget to share your creations with others – whether it’s through social media posts or giving handmade gifts to friends and family members.
Finally, keep in mind that creative upcycling is not just about making pretty things; it’s also about making a positive impact on the environment. By repurposing items that would otherwise end up in landfills, you’re helping reduce waste and minimize your carbon footprint. So next time you’re tempted to throw something away, think twice – it could be the key ingredient for your next upcycling masterpiece!
Upcycling is a fantastic way to turn everyday objects into beautiful, functional, and often unique crafts. By giving new life to items that might otherwise be discarded, upcycling not only fosters creativity but also promotes sustainability. Here’s a guide to some creative upcycling projects that transform common household items into stylish and useful crafts.
1. Glass Jars: From Storage to Decor
Glass jars are incredibly versatile and can be upcycled into various decorative and functional items.
1.1 Painted Mason Jar Vases
– Materials: Mason jars, acrylic paint, paintbrushes, ribbon or twine.
– Instructions: Clean the jars thoroughly and let them dry. Paint the exterior of the jars in your favorite colors or designs. Once dry, wrap the neck with ribbon or twine. These jars make beautiful vases for fresh or dried flowers, or they can be used as decorative containers for utensils or makeup brushes.
1.2 Candle Holders
– Materials: Glass jars, tea light candles, decorative stones or sand, paint or decoupage materials.
– Instructions: Place a layer of decorative stones or sand at the bottom of the jar. Add a tea light candle. You can leave the jar plain or decorate the exterior with paint, decoupage, or twine. These candle holders create a warm, ambient glow perfect for indoor or outdoor spaces.
1.3 Storage Containers
– Materials: Glass jars with lids, chalkboard paint, labels, or tags.
– Instructions: Paint the jar lids with chalkboard paint so you can label them with chalk. Use the jars to store pantry staples like rice, pasta, or spices, or for organizing small craft supplies like buttons or beads. This project is both functional and visually appealing.
2. Old Clothes: Fashionable and Functional Repurposing**
Old clothes, especially those with interesting patterns or fabrics, can be upcycled into new fashion items or home accessories.
2.1 T-Shirt Tote Bags
– Materials: Old t-shirts, scissors, needle and thread or a sewing machine.
– Instructions: Cut the sleeves off an old t-shirt and then cut out the neckline to create handles. Turn the shirt inside out and sew the bottom hem closed. Turn it right-side out again to create a no-sew or simple sew tote bag. These bags are great for grocery shopping or as casual carry-alls.
2.2 Denim Pocket Organizers
– Materials: Old jeans, scissors, fabric glue, or sewing materials.
– Instructions: Cut out the pockets from old jeans, leaving a bit of the fabric around the edges. Arrange the pockets on a piece of fabric or directly on a wall, and secure them with fabric glue or by sewing. Use these pockets to organize small items like scissors, pens, or craft supplies.
2.3 Patchwork Pillows
– Materials: Fabric from old clothes, pillow stuffing or a pillow insert, needle and thread or a sewing machine.
– Instructions: Cut fabric squares from various old clothes, sew them together to form a patchwork front, and attach it to a solid fabric back. Stuff the pillow or insert a pillow form and sew it closed. These pillows add a personalized and cozy touch to any room.
3. Wine Corks: Small but Mighty Upcycles
Wine corks are small, but they can be upcycled into a variety of creative and functional crafts.
3.1 Cork Coasters
– Materials: Wine corks, a hot glue gun, utility knife, sandpaper.
– Instructions: Cut the corks into even slices. Arrange them in a circular pattern and glue them together to form a coaster. Sand the edges smooth. These coasters are not only practical but also add a rustic charm to your table.
3.2 Cork Bulletin Board
– Materials: Wine corks, a picture frame or a piece of wood, hot glue.
– Instructions: Glue the corks inside a picture frame or onto a piece of wood in a grid or pattern. This corkboard is perfect for pinning notes, photos, or reminders, and makes a great addition to a home office or kitchen.
3.3 Cork Keychains
– Materials: Wine corks, eye screws, key rings, decorative charms or beads.
– Instructions: Screw an eye screw into one end of a cork, attach a key ring to it, and add any decorative charms or beads. These keychains are lightweight, durable, and easy to personalize.
4. Tin Cans: Industrial Chic Decor
Tin cans can be upcycled into stylish and practical items for your home.
4.1 Tin Can Planters
– Materials: Empty tin cans, paint or wrapping paper, ribbon, soil, plants.
– Instructions: Clean and dry the cans, then paint them or cover them with decorative paper. Punch a few drainage holes in the bottom, fill with soil, and add your favorite plants or herbs. These planters are perfect for windowsills or outdoor spaces and add a touch of industrial chic to your decor.
4.2 Cutlery Holders
– Materials: Tin cans, paint or fabric, hot glue, label tags.
– Instructions: Decorate the exterior of the cans with paint, fabric, or other materials. Attach labels for “Forks,” “Spoons,” and “Knives.” These holders are perfect for organizing cutlery at a casual buffet or picnic.
4.3 Lanterns
– Materials: Tin cans, hammer, nails, paint, tea light candles or LED lights.
– Instructions: Use a hammer and nail to punch holes in decorative patterns on the sides of the can. Paint the can if desired, and place a tea light or LED light inside. These lanterns cast beautiful patterns of light and are great for outdoor parties or cozy indoor lighting.
5. Cardboard Boxes: From Trash to Treasure
Cardboard boxes can be transformed into useful and decorative items with just a little creativity.
5.1 Cardboard Organizer
– Materials: Cardboard boxes, scissors, glue, decorative paper or fabric.
– Instructions: Cut the boxes to the desired size and shape, and cover them with decorative paper or fabric. Stack and glue them together to create an organizer for your desk, drawers, or shelves. This project helps keep your space tidy and adds a personal touch.
5.2 Decorative Storage Bins
– Materials: Sturdy cardboard boxes, fabric or wrapping paper, glue, ribbon.
– Instructions: Cover the outside of the box with fabric or wrapping paper, securing it with glue. Add a ribbon around the top edge for a finished look. These storage bins are perfect for organizing toys, books, or craft supplies while adding a decorative element to your home.
5.3 Cardboard Playhouses
– Materials: Large cardboard boxes, paint, markers, scissors, tape.
– Instructions: Cut windows and doors into the box to create a playhouse, castle, or spaceship. Let your kids decorate it with paint, markers, and stickers. This project is not only fun but also encourages imaginative play.
6. Old Books: Literary Upcycling
Old books that are damaged or no longer readable can be upcycled into beautiful and functional crafts.
6.1 Book Page Wreath
– Materials: Old book pages, a wreath form, glue, ribbon.
– Instructions: Roll book pages into cones and glue them around a wreath form, layering them to create a full wreath. Add a ribbon for hanging. This wreath adds a vintage or literary touch to your decor.
6.2 Hidden Storage Books
– Materials: An old hardcover book, utility knife, glue, fabric.
– Instructions: Use a utility knife to cut out the pages of the book, leaving a hollow space inside. Glue the remaining pages together to form a sturdy box. Line the inside with fabric for a polished look. These hidden storage books are perfect for storing small items discreetly on a bookshelf.
6.3 Book Art
– Materials: Old books, glue, paint, scissors, or a craft knife.
– Instructions: Fold, cut, or glue the pages of an old book to create 3D sculptures, such as hearts, stars, or other shapes. You can also paint or decoupage the covers for added decoration. Book art makes a unique and thoughtful gift or a distinctive decor piece.
Tips for Creative Upcycling
– Think Outside the Box: Almost any item can be upcycled. Look at objects not just for what they are, but for what they could become.
– Combine Materials: Don’t be afraid to mix materials, such as combining glass with wood or fabric with metal, to create something entirely new.
– Start Small: If you’re new to upcycling, start with small projects to build your confidence and skills.
– Be Sustainable: Use eco-friendly materials, and consider how you can minimize waste throughout your projects.
– Personalize It: Add your personal touch to each project, whether through colors, patterns, or embellishments.
Creative upcycling is a fun and rewarding way to turn everyday objects into beautiful crafts, reducing waste and adding a unique, personal touch to your home. Whether you’re repurposing old jars, clothes, or cardboard, these projects offer endless possibilities for creativity and sustainability.
CONCLUSION
Creative upcycling is a wonderful way to unleash your creativity while also reducing waste and contributing positively to the environment. By looking at everyday objects with fresh eyes and experimenting with different materials and techniques, you can transform simple items into beautiful crafts that bring joy to both yourself and others. So why not give creative upcycling a try? Who knows what hidden treasures you might discover right in your own home!

Let's Draw!
Copyright © 2024 Crafty Corner Shop. All rights reserved.
